Creating a New Book
To create a new book, first ensure that you have unpacked all the
article source files to a temporary location. In this example, I
have put the files in ~/Documents/PMLR/OriginalFiles/
listed as follows:
~/Documents/PMLR/OriginalFiles/- MaryJanedeBeer/
- article.tex
- references.bib
- shapes.pdf
- m-j-darce/
- figs/
- shapes.png
- WorkshopOnSomethingArticle.tex
- refs.bib
- figs/
- DoeJones/
- DoeJones-supp.pdf
- main.tex
- refs1.bib
- refs2.bib
- results.tex
- table1.tex
- table2.tex
- Smith/
- article.tex
- jmlr2e.sty
- refs.bib
- shapes.eps
- WFJ/
- figs/
- shapes.pdf
- mystuff.sty
- refs.bib
- WinterFinchleyJones.tex
- figs/
- MaryJanedeBeer/
There are some commonly-encountered issues with some of these source files:
- Some of the articles have PDF or PNG images, which indicates
that their authors use pdflatex, but one of the articles
(Smith) has an EPS file, which means that the author used
latex rather than pdflatex.
The original latex application (which creates a DVI file) can read EPS files, but it can't read PDF or PNG (or JPG) files. Whereas pdflatex can read PDF, PNG and JPG files, but can't read EPS files. When we compile the book, we can't switch output devices during compilation, so this could potentially cause problems.
Luckily most modern TeX distributions are able to convert EPS to PDF during document compilation, but to ensure this works, the image file should be included in the document using \includegraphics{<imagefile>}, where <imagefile> is the name of the image file without the file extension.
This is one of the reasons why MakeJmlrBookGUI uses pdflatex rather than latex.1 Unfortunately, in this example the author has used the obsolete epsfig package and has included the image with \epsfig. This means that in order for the book to compile correctly, all instances of \epsfig must be replaced with \includegraphics with the file extension removed. This is a time-consuming task, especially if the author hasn't used a single .tex file for the article source, but has spread the document code out in multiple .tex files that have been included with \input.
MakeJmlrBookGUI's new book function tries to overcome this problem by performing the substitutions for you.
- Another problem with the Smith article is that it uses the old
jmlr2e package with the article class instead of using
just the new jmlr class. Since the jmlrbook class
depends on the imported articles using the jmlr class, this
will cause a problem when compiling the book.
MakeJmlrBookGUI's new book function can detect this problem and will perform the relevant substitutions.
- In the WFJ article, the authors have provided a
custom package (called mystuff.sty) loaded in
WinterFinchleyJones.tex.
This typically just contains a series of short cut command definitions.
Since this isn't a standard package, the main book file won't find it.
While it is possible to just put a copy of mystuff.sty
in the main book directory, it's possible that the definitions in
mystuff.sty will conflict with custom commands defined in the
other articles. For example, it's quite typical for authors to
define \eg as a short cut for "e.g." (possibly with
space factor adjustments).
When each article is imported into the book, the article source is scoped, so that any definitions made with \newcommand or \renewcommand only have an effect within the article. This means that if, say, both de Beer et al's article (article.tex) and Doe et al's article main.tex have:
\newcommand{\eg}{e.g.\ }there won't be a conflict. However, if mystuff.sty has also defined \eg and you include it in the main book file, then \eg will already be defined when article.tex and main.tex try to define it. Therefore it's not a good idea to use mystuff.sty for the book. If the mystuff package just contains a series of command definitions, then the best course of action is to just copy those command definitions into the article's main file (WinterFinchleyJones.tex in this case) and remove\usepackage{mystuff}.MakeJmlrBookGUI's new book function will alert you if an article tries to load a package that is not in your TeX distribution.
- The d'Arçé (m-j-darce) article has a subdirectory for images
(figs/) and has used \graphicspath instead of
specifying the subdirectory in \includegraphics. This can cause
a problem when compiling the main book as the jmlrbook class
needs to modify the input paths when importing articles to ensure
that any relative paths are correctly resolved.
MakeJmlrBookGUI's new book function solves this problem by removing \graphicspath and inserting the subdirectory in the argument of \includegraphics.
- The Doe et al (DoeJones) article has multiple .tex
files. The main file is main.tex which includes (via
\input) the file results.tex, which in turn inputs
table1.tex and table2.tex. This won't in itself
cause a problem when the book is compiled, but if the author has
made an error in the file, it's harder to track down which file the
problem is in. To overcome this, MakeJmlrBookGUI's new book function
will insert all the included files to create a single .tex
file.
Note that the new book function creates copies of the source files, rather than modifying the originals, so you will still have the originals for reference or to fall back on if something goes wrong.
The other problem will all these files, is that none of them follow the PMLR file naming scheme <lastname><YY>[<suffix>] where <lastname> is the first author's surname, <YY> is the two-digit year of the conference or workshop and <suffix> is a single letter to disambiguate in the event of duplicate names (for example, smith15a and smith15b). The new book function will attempt to name the new files as appropriate. It will also copy over any supplemental files provided they match *-supp.* (for example, smith-supp.zip).
To create a new book use the File->New Book... menu item. This will display the dialog shown in Figure 3.
 |
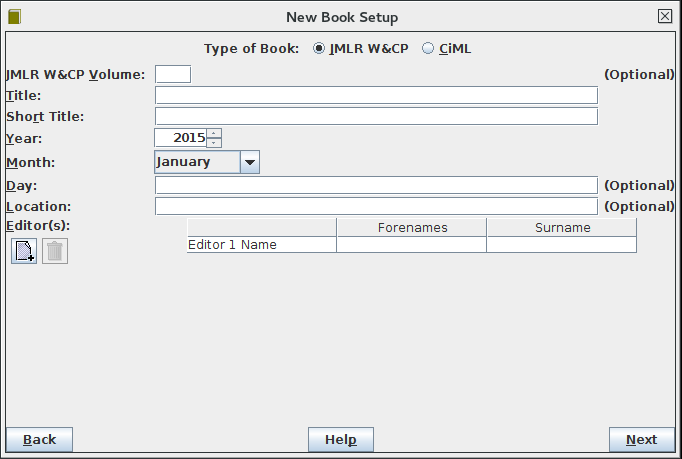
When you're ready, click "Next" to move to the next screen, shown in Figure 4. If you are creating a CiML book, click on the "CiML" radio button, which will display the screen shown in Figure 5.
 |
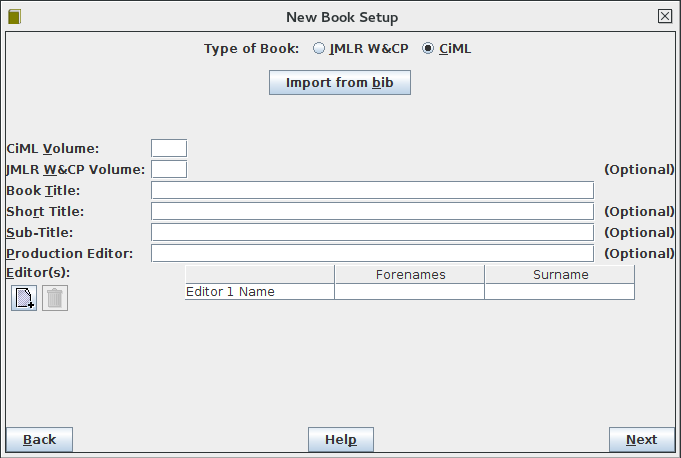 |
The CiML setting has a button labelled "Import from bib" which you can use the populate the fields from a .bib file previously created for the PMLR according to their specifications. You will need to add the CiML volume number as this isn't stored in the .bib file. The .bib file must be located in the base directory relative to the source files. (In this example, that's the OriginalFiles directory shown above, but the file naming scheme has to match the PMLR requirements. This should be the case if you previously created the proceedings files and generated the .bib file using the Build->Create bib... menu item.)
The volume number is optional for the PMLR setting as it may not have been allocated yet. In this situation, leave the volume field empty and when you do find out the number, change the value of
\jmlrvolume{0}
to the appropriate number in the LaTeX source code.
Each editor is entered in the "Editor(s): " table. The
forenames should go in the "Forenames" column and the surname in the
"Surname" column. To add a new row, click on the
add ![]() button. If you want to delete an editor,
select the unwanted row and click on the remove
button. If you want to delete an editor,
select the unwanted row and click on the remove
![]() button. Sample title information for a
PMLR volume is shown in Figure 6.
button. Sample title information for a
PMLR volume is shown in Figure 6.
 |
When you have finished specifying the title information, click on "Next" to move to the next screen. If you have specified a PMLR volume, the screen will be as shown in Figure 7. If you have specified a CiML book, the screen will be as shown in Figure 8.
 |
 |
In both cases, there is the option to have a preface at the start of
the book. If the book requires a preface, check the
"Yes, the book should have a preface" button. If you already
have a file containing the preface text, select the
"Preface .tex source file" button and use the
file selector to specify the location of this file. (Click on the
browse ![]() button to open the file selector.)
If the preface hasn't been written yet, select the
"Create New File" button to create a
new file.
button to open the file selector.)
If the preface hasn't been written yet, select the
"Create New File" button to create a
new file.
If you have specified a CiML book, you can do likewise for the foreword. When you are ready, click on "Next" to move to the next screen, shown in Figure 9. All options are available for CiML books. None of these options are available for PMLR volumes.
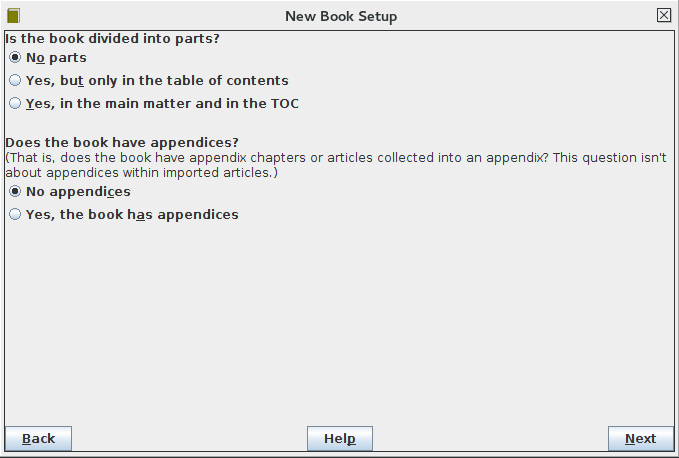 |
For the CiML book, if the articles should be grouped into parts (for example, "Part 1: Fundamentals and Theory" and "Part 2: Applications"), then select "Yes, but only in the table of contents" or "Yes, in the main matter and in the TOC". If the book should also have articles included as an appendix, select "Yes, the book has appendices" otherwise select "No appendices".
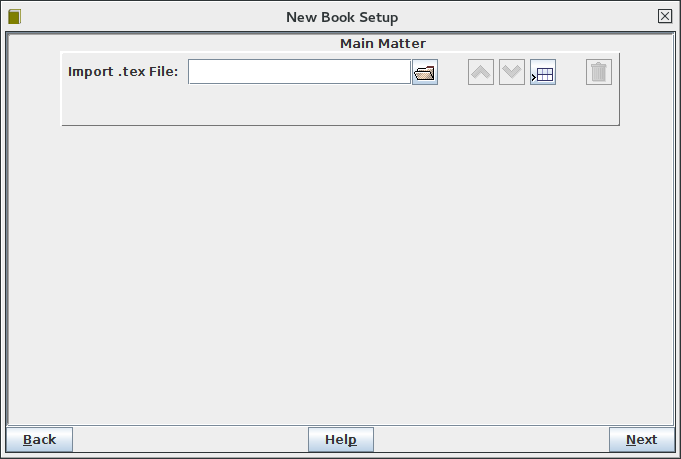
When you are ready, click on "Next" to move to the next screen. This will appear as shown in Figure 10 for PMLR volumes.
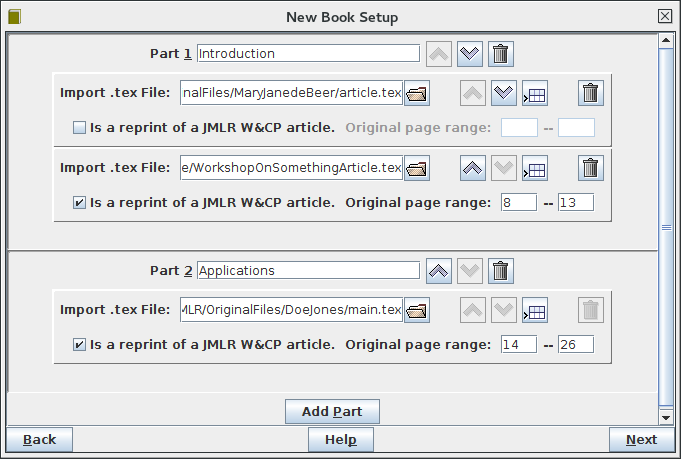
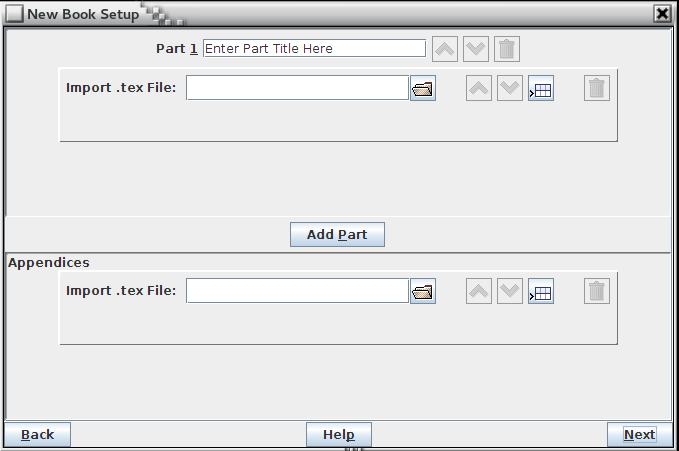
For CiML books, the screen will vary according to the options from the previous screen. If you have specified no parts and no appendices, the screen will be as shown in Figure 11. If you have specified parts, then the screen will be as shown in Figure 12. If you have specified appendices, there will also be an appendix panel. For example, Figure 13 is for a CiML book with parts and appendices.
 |
 |
 |
 |
For CiML books, each import file panel has a check box, which should be selected if the article was originally published in a PMLR (or JMLR W&CP) volume. If this box is checked, you need to enter the start and end page numbers from the original PMLR article.
In the import file panel, use the file selector
![]() to select the article's .tex file.
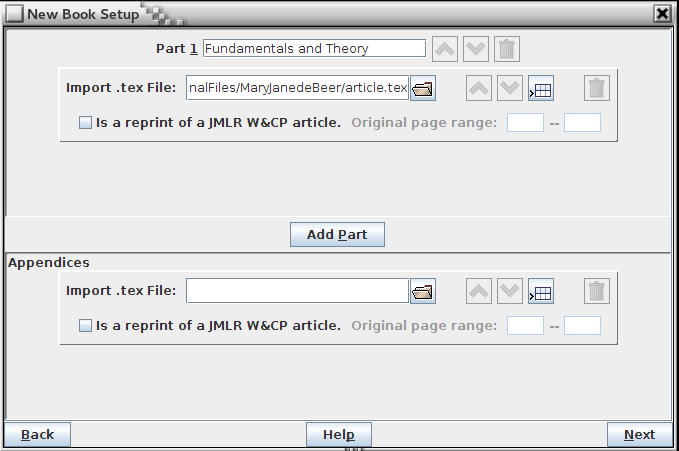
If the author has supplied multiple .tex files, you need to
make sure you only select the file containing the
\documentclass command. For example, in
Figure 14, I've selected the
article.tex file. This file isn't a reprint (perhaps it's
an introductory article for the CiML book) so I've left the
reprint box unchecked. This reprint option isn't available for the
PMLR version (Figure 15).
to select the article's .tex file.
If the author has supplied multiple .tex files, you need to
make sure you only select the file containing the
\documentclass command. For example, in
Figure 14, I've selected the
article.tex file. This file isn't a reprint (perhaps it's
an introductory article for the CiML book) so I've left the
reprint box unchecked. This reprint option isn't available for the
PMLR version (Figure 15).
 |
 |
To add a new article to the list, click the new row
![]() button to add a new import panel.
To add a new part panel, click on the
"Add Part" button. You can reorder
articles within a part using the up or down arrow buttons. You can
remove an import panel by clicking on the associated
button to add a new import panel.
To add a new part panel, click on the
"Add Part" button. You can reorder
articles within a part using the up or down arrow buttons. You can
remove an import panel by clicking on the associated
![]() button. Drag and drop is supported for
this panel, so you can drag import panels up or down to a new
location. You can also drag and drop files from your filing system
onto the import panels, if your operating system supports this.
button. Drag and drop is supported for
this panel, so you can drag import panels up or down to a new
location. You can also drag and drop files from your filing system
onto the import panels, if your operating system supports this.
In Figure 16 I have selected all my sample files. The first part has the title "Fundamentals and Theory" and has the de Beer and d'Arçé articles. The second part has the title "Applications" and has the Doe and Smith articles. The final article, de Winter et al, is in the appendices section.
 |
When you're ready, click on the "Next" button to
move to the next screen, as shown in Figure 17. This
screen specifies in which directory the new book will be created.
The default name for this directory is given by "Volume" followed
by the volume number. Earlier in this example, I entered "53" for
the volume, so the default directory name is Volume53. The
path this directory resides in is specified in the right-hand field.
You can change it using the file selector ![]() .
.
Note that the book directory can't already exist. This is a precautionary measure to ensure you don't accidentally overwrite the original files, in case they are still needed.
 |
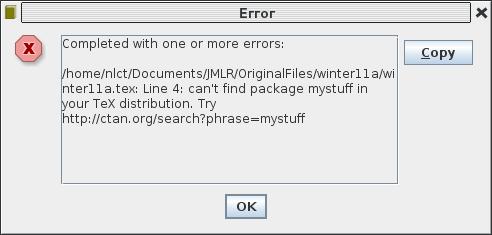
When you are ready, click on the "Next" button. This will start the new book creation process. Recall from earlier that the Winter et al example had a custom package newstuff.sty provided by the author. Since this is likely to cause a problem, an error message is shown (Figure 18). This identifies the problem file and the line number where the \usepackage command occurred. There's a possibility that the package may actually be available on the Comprehensive TeX Archive Network (CTAN) but isn't installed on your computer. In which case you're provided with a URL that you can copy and paste into your web browser to check.2 If it turns out that the package is available on CTAN, you will need to install it and then edit the article's new .tex file to uncomment the relevant \usepackage command, and you will also need to edit the book's .tex file to add it to the list of required packages.
 |
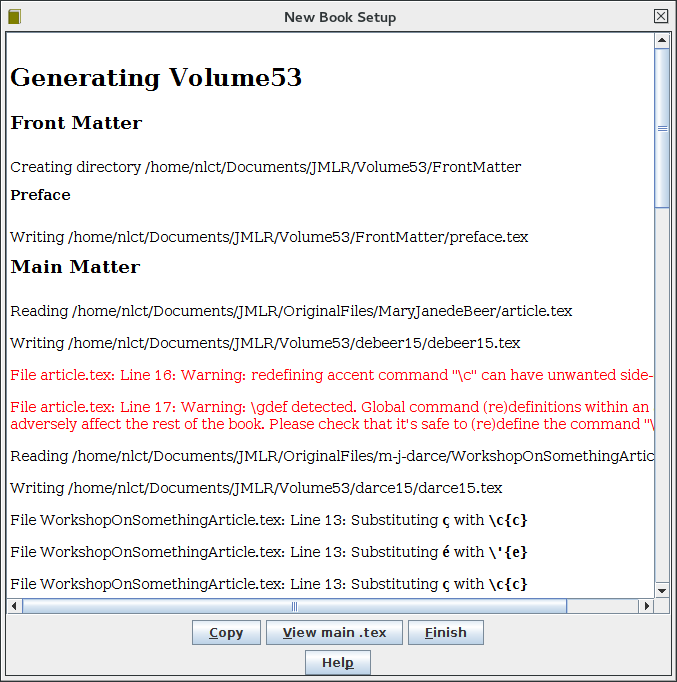
Once you dismiss this message box, you can view the transcript in the final screen of the new book dialog (see Figure 19). If you want a copy of this transcript, you can copy it to the clipboard using the "Copy" button. If you want to view the newly created book file, click on the "View main .tex" button.
 |
You can now either close the new book dialog by clicking on the close window button in the title bar, which will do nothing further, or you can click on the "Finish" button, which will close the dialog and load the new book into MakeJmlrBookGUI.
Footnotes
- ...latex.1
- Another reason is that pdflatex handles hyperlinks better than latex.
- ... check.2
- The fact that mystuff.sty is present in the article's directory doesn't mean that it's the author's file as authors often copy all the packages they use into their article's directory.
