This site uses strictly necessary session cookies to enable the site to function correctly and to keep your personal information secure when you are logged in. [Settings]
A file can be loaded from the command line invocation
(see Introduction) or in the GUI using the
File➜Open menu item. You can also use the load file button
on the toolbar or (if permitted by your operating system) drag and drop
the file onto the main window. The input file should be the .aux
file created by LaTeX, but if you try to load the main document
.tex file or the .log transcript file,
MakeGlossariesGUI will assume you meant the associated .aux file.
(If you have used LaTeX's -jobname or -output-directory
options, then you won't be able to use the .tex file and will have
to use either the .aux or .log file.)
Example 1.
Suppose you have the following document (called, say, basic-sample.tex):
First run LaTeX the usual way. This should create the auxiliary file
basic-sample.aux as well as some other files including
basic-sample.glo and basic-sample.ist. Now load the auxiliary file
(basic-sample.aux) into MakeGlossariesGUI. (Since the main .tex file
has the same basename as the .aux file, you can also use that, as
mentioned above.)
Once MakeGlossariesGUI has successfully loaded the .aux file, it will run
makeindex on the associated .glo file (with the
.ist file as the style).
In this case, there are no problems with the document and the
.tex file is now ready for another LaTeX run. The general
information panel (Figure 1) shows a summary of the
document glossaries. In this case, there's only one glossary (the
main one). If you edit the document source code (.tex file)
you can use the File➜Reload menu item to reload the updated
.aux file in MakeGlossariesGUI.
Figure 1: General Information Panel (Basic Sample)
In this example, only one entry has been indexed in the main glossary. You
can find out more information by clicking on the "Details"
link, which will open the window shown in Figure 2.
Figure 2: Entry Details (Basic Sample)
Since only one entry has been used, there's only one row. The first
column lists the entry's label, the second column lists the entry's sort
field and the third column shows the number of times that entry was indexed
in the document. If you have a long list of entries, you can use the search
box to find an entry according to its label. (The sort column
isn't searched.) Regular expressions are permitted.
The Diagnostics tab
(Figure 3) provides information, warnings
and suggestions. In this example, there are no errors detected, so it
just provides suggestions and some links on how to incorporate
makeglossaries into your document build process. There are
also two buttons provided to test the makeglossaries
and makeglossaries-lite.lua scripts. In the first case,
the action will also test if Perl is installed.
Figure 3: Diagnostics Tab (Basic Sample)
If you have defined an entry in your document, but it's not listed in
the details window for the relevant glossary, then it hasn't been indexed
in your document. Remember that the commands described in section 9
("Using Glossary Terms Without Links") of the glossaries
manual don't index the terms. These essentially are all the commands in the
form \glsentry⟨field⟩ or
\glossentryname⟨field⟩, such as
\glsentrytext, \glsentryshort,
\glsentrylong or \glossentryname, and their
case-changing variants. Also \glsentrytitlecase and
\glshyperlink.
If you're using the glossaries-extra package, remember that
the noindex option will suppress indexing.
Example 2.
Now let's consider the following document (called, say,
missing-sort.tex):
As before, run LaTeX as usual on this document. Since the xindy
package option has been used, this will create a .xdy file
instead of a .ist file and the .glo
file is now in xindy's format. There are, however, problems
with this document. The glossaries manual advises using the
sort key for entries that contain special characters or commands
in the entry's name. This document hasn't followed that advice, and
xindy will complain. The S entry just causes a warning:
Would replace complete index key with empty string, ignoring
and the S entry is ignored. The alpha and beta
entries cause an error:
index 0 should be less than the length of the string
Again the entries are ignored, but the message is fairly cryptic.
If we load the auxiliary file (missing-sort.aux) into
MakeGlossariesGUI, these problems are detected, and the following error message is
displayed:
Xindy has ignored one or more entries with empty sort strings.
Xindy failed with exit code 1.
Once this error message has been dismissed, the
Diagnostics tab
should automatically be selected (see Figure 4).
This identifies the problem entries and recommends a solution, in this case,
add the sort key to the entry definition. The actual warning and
error message reported by xindy are shown at the end.
(You can adjust the font used by these messages if you like,
see Settings.)
Figure 4: Diagnostics Panel
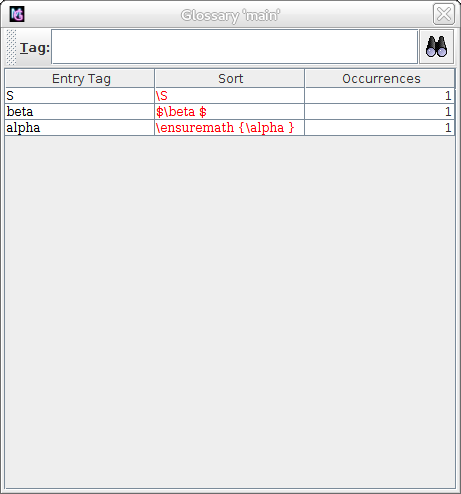
In the General Information panel, the "Details"
link can again be used to view the list of indexed entries,
but now the problematic entries are shown in red (see
Figure 5).
Figure 5: Entry Details (Problematic Entries)
MakeGlossariesGUI actually performs more problem-checking than
makeglossaries as it also tries to parse
the log file for certain messages (but only in GUI mode).
This is illustrated in the next example, which won't generate any error
messages from makeglossaries.
If you use the normal method of LaTeX,
makeglossaries, LaTeX, you won't get any
error messages, but the glossary won't be displayed. Why not?
If we switch from
\usepackage{glossaries}
to
\usepackage{glossaries-extra}
then we do finally get an error:
! Package glossaries-extra Error: Glossary type 'acronym' doesn't exist.
The glossaries-extra package is stricter than
the base glossaries package. The problem here
is that I've used type=acronym, but there's no
glossary with that label. (I haven't used the acronym
option.) If you're not using the extension package, this is
harder to pick up, but MakeGlossariesGUI will notify you of the problem.
This example document will trigger the error
No glossary 'acronym'.
and the diagnostics panel will show the message:
It looks as though you might have done something like
\printglossary[type={acronym}], but there's no
acronym glossary.
If you switch to the General Information panel,
the labels for the glossaries defined in the document are
listed next to "Defined Glossaries:" so you
can check the indicated type against it. In this example,
the list has only the single label "main".
Remember that you not only have to define your entries, but you also
have to index them if you want them to appear in the glossary. The
glossaries package provides many commands that index entries,
the most commonly used one being \gls, which displays
the text associated with the entry, indexes the entry,
marks it as having been used and (if the hyperref package has
been loaded) also creates a link to the definition in the glossary.
Other commands provide variations, such as displaying different text
or not changing the "first use flag". In particular, the
\glsadd command only indexes the entry without displaying any
text.
Example 4.
In the sample document below, I've defined an entry but it hasn't been
indexed anywhere in the document.
My first step, as usual, is to run LaTeX on this document, which will
create the .aux file. Now if I try loading this file into MakeGlossariesGUI
I get the error message:
No entries were found for glossary 'main'.
The diagnostics panel shows the following message:
There were no entries listed for the main glossary. Remember that you
must index entries for them to appear in the glossary using the commands
provided by the glossaries package. Entries that have been defined but not
indexed won't be listed. If you don't want to use this glossary,
add the nomain package option to your document. Check the following:
Have you used commands like \gls or \glsadd in the
document? (If you haven't, you need to add them.)
If you have used commands like \glsadd or \glsaddall
in the preamble, have you remembered to put them after\makeglossaries
If you have at least version 4.24 of the glossaries package, have you used the debug option? (That might provide some more information for me to analyse.)
(The sentence referencing nomain only appears if there are
no entries for the main glossary, but not for any other glossaries.)
If I load the .aux file for this document into MakeGlossariesGUI, I get
the following message in the diagnostics panel:
It seems you've used \makenoidxglossaries, which means you don't
need xindy or makeindex, you just need a second LaTeX run to get the glossary
up to date.
Note that MakeGlossariesGUI can still provide some limited diagnostics even when
\makenoidxglossaries has been used. To illustrate this, if we
modify the above sample document slightly, introducing an error:
This provides some additional information in the diagnostics panel:
Package glossaries Warning: Empty glossary for
\printnoidxglossary[type={acronym}] Rerun may be
required (or you may have forgotten to use commands like \gls) on input
line 13.
It looks as though you might have done something like
\printnoidxglossary[type={acronym}], but there's no
acronym glossary.
So MakeGlossariesGUI picks up the error.
Note that MakeGlossariesGUI also looks for warnings from the glossaries
package, so if you are encountering any problems, make sure you
haven't suppressed the warnings with the nowarn package option.
Example 6.
In this example I've omitted \printglossary from the document:
This doesn't cause any problems for makeindex as all
the associated files have been created correctly. The document simply
doesn't load the file generated by makeindex as there's
no \printglossary (or \printglossaries). However
the glossaries package does generate a warning, and this
warning is picked up by MakeGlossariesGUI and displayed in the diagnostics panel:
Package glossaries Warning: No \printglossary or
\printglossaries found. (Remove \makeglossaries
if you don't want any glossaries.) This document will not have a glossary.
If you suppress these warnings then MakeGlossariesGUI can't help.
Sometimes things can go so badly wrong that LaTeX doesn't even
generate an auxiliary file. In this case you can load the .log
file instead. (You'll need to change the file selector filter to
show all files.) MakeGlossariesGUI will parse the log file to see if it recognises
any of the error messages. Some LaTeX error messages can be quite
crytic so there's no guarantee that MakeGlossariesGUI will be able to help, but it
might detect something useful. Note that this option is only available
in GUI mode.
This document goes badly wrong. The first error message is:
! Undefined control sequence.
\in@ #1#2->\begingroup \def \in@@
If I load the log file into MakeGlossariesGUI, the diagnostic panel displays the
following:
Since the aux file doesn't exist, there's not much I can do to help,
but I'll parse the log file in case there are any clues there.
It's possible that there's an expansion issue involving a fragile command.
Things to check for:
Have you used a class like beamer that doesn't make common
formatting commands like \textit robust?
Have you tried using \protect in front of fragile commands
contained within your entry definitions?
Have you tried switching off the expansion using commands like
\glsnoexpandfields? (See section 4.6 Expansion in the
glossaries user manual.)
The problem here is that a fragile command has been used in the entry
definition. The problematic command in this example is
\textit, which is normally robust, but it happens to be
fragile with the beamer class. The solution is to either
protect the problematic command with \protect or
use \glsnoexpandfields before you define the entries.
For example:
The main panel shows the character encoding that MakeGlossariesGUI believes
is being used by the indexing application and, if detected, the
document input encoding. Since makeindex only supports
characters in the range 1 to 255, MakeGlossariesGUI assumes
ISO-8859-1 (Latin-1) for makeindex and will add an advisory
note if the document class uses a different encoding.
This document is saved as UTF-8 and has a term where the sort
value starts with an extended character. This doesn't work as
makeindex treats the UTF-8 letter as two separate
characters form from the two octets. This not only affects the
sorting but also causes a problem for the indexgroup
style.
Figure 6: Encoding Problems (Diagnostics Panel)
The first message in the diagnostics panel (see
Figure 6) is only picked up after you
rerun LaTeX and reload the file in MakeGlossariesGUI, as it's only after the
glossary file has been created by makeindex that the
LaTeX call fails. The failure is caused by the first octet
appearing in the argument of \glsgroupheading. This
causes two problems: the argument of this command is a label so
special or active characters will break it, and the inputenc
package makes the first octet active, requiring the second octet as
the argument. The message reads:
There seems to be a problem with the letter group label Ã. The label is used to construct a command name, so it can't contain any special characters. (This includes extended characters if you're using inputenc.sty.)
l.3 \glsgroupheading{Ã}
You may want to consider using xindy with a LaTeX engine that has native Unicode support (XeLaTeX or LuaLaTeX) or use bib2gls instead.
This message doesn't show up when you first attempt to create
the glossary files with MakeGlossariesGUI. However, there's advisory message
than points to a problem:
The indexer encoding 'ISO-8859-1' doesn't seem to match the document
encoding (utf8). This may not be a problem if you aren't using extended
characters in the sort values.
In this case it is a problem. The two different encodings are
also shown in Figure 6. The indexer
encoding is listed as ISO-8859-1, and the document encoding is listed
as utf8.
Figure 7: Encoding Problems (General Information Panel)