7.5 ⁂Displaying a Calendar
The pgfcalendar package provides the command:
This is a loop macro that iterates from ⟨start date⟩ to ⟨end date⟩ and performs ⟨code⟩ at each iteration. Within ⟨code⟩ you can access information about the current iteration using:
\pgfcalendarcurrentjulianThis is a TeX count register that holds the Julian day number for the current iteration;\pgfcalendarcurrentweekdayThe current week day index (0 for Monday, 1 for Tuesday, etc);\pgfcalendarcurrentyearThe current year;\pgfcalendarcurrentmonthThe current month (always two digits with a leading zero, if necessary);\pgfcalendarcurrentdayThe current day of the month.
\pgfcalendarprefixThe ⟨prefix⟩ parameter;\pgfcalendarbeginisoThe ⟨start date⟩ in ISO format;\pgfcalendarbeginjulianThe ⟨start date⟩ as a Julian day number;\pgfcalendarendisoThe ⟨end date⟩ in ISO format;\pgfcalendarendjulianThe ⟨end date⟩ as a Julian day number;\ifdate{⟨tests⟩}{⟨true code⟩}{⟨false code⟩}The same as using
\pgfcalendarifdatefor the current date.\pgfcalendarsuggestednameIf ⟨prefix⟩ is empty, this expands to an empty string, otherwise it expands to ⟨prefix⟩-⟨YYYY⟩-⟨MM⟩-⟨DD⟩ so it can be used, for example, as a node name if the calendar is typeset using the tikz package's
tikzpictureenvironment [102].\pgfcalendarshorthand{⟨kind⟩}{⟨representation⟩}This will expand to a representation of the current day, month, year or day of week, depending on whether ⟨kind⟩ is d, m, y or w. The ⟨representation⟩ may be one of:
- Numerical representation with no leading zeros; = Numerical representation with a leading space for single digit numbers; 0 Numerical representation with a leading zero for single digit numbers; t Textual representation; . Abbreviated textual representation. Typically you would use:
before
\pgfcalendarso that you can simply write, for example, \%wt instead of:but make sure you localise the effect of the
\letby placing it inside a group or environment so that the normal behaviour of \% is restored after the calendar has been typeset.
Examples:
- To just display the day of the month from 2014-02-26 to 2014-03-15:
produces:
- To display the date for each day from 2014-03-01 to
2014-03-04:
{% localise effect of \let
  \let\%\pgfcalendarshorthand
  \pgfcalendar{}{2014-03-01}{2014-03-04}{\%w. \%d- \%mt \%y0\par}
}
produces:
The tikz package (part of the pgf bundle) provides
a powerful and user-friendly way of drawing images. An in-depth
discussion of the tikz package is beyond the scope of this
book, but here's a very brief introduction to drawing nodes in
a tikzpicture environment to help draw a simple
calendar. For more detail about tikz, see the pgf user
manual [102].
Within the tikzpicture environment, you can use
to draw a node. Alternatively you can use
The full syntax is more complicated, but the (⟨node name⟩) is
optional, as are the key=value lists ⟨path options⟩ and
⟨node options⟩. (Spaces before and after the commas and equal
signs are ignored.) The full syntax of (⟨position⟩) is also
quite complicated, but here I'll just use the
(⟨x⟩,⟨y⟩) syntax.
Example:
(Don't forget to load the tikz package.)
\fbox{%
 \begin{tikzpicture}
  \path (0,0) node {Mon};
  \path (1,0) node {Tue};
  \path (2,0) node {Wed};
  \path (3,0) node {Thu};
  \path (4,0) node {Fri};
  \path (5,0) node {Sat};
  \path (6,0) node {Sun};
 \end{tikzpicture}%
}
I've used the \fbox command (described in Volume 1) to put
a border around the picture. Fancier borders can be created using
tikz commands within the tikzpicture environment.
The above code produces:
It's possible to add a \pgfcalendar command to this environment
and put the node drawing part in the ⟨code⟩ argument. Since
\pgfcalendarcurrentweekday is an integer from 0 (Monday) to
6 (Sunday), it can be used for the ⟨x⟩ coordinate. Since
tikz uses a right-handed co-ordinate system, the row below the
⟨y⟩ = 0 weekday name row displayed above needs to be
negative. For example:
\fbox{%
 \begin{tikzpicture}
 % First row
  \path (0,0) node {Mon};
  \path (1,0) node {Tue};
  \path (2,0) node {Wed};
  \path (3,0) node {Thu};
  \path (4,0) node {Fri};
  \path (5,0) node {Sat};
  \path (6,0) node {Sun};
 % Second row
  \pgfcalendar{}{2014-03-01}{2014-03-02}{
   \path (\pgfcalendarcurrentweekday,-1)
     node {\pgfcalendarcurrentday};
  }
 \end{tikzpicture}%
}
This produces:
A counter is required if more than one week needs to be displayed. For example:
% Define a new count register:
\newcount\rowcount
% Initialise:
\mycount = 1\relax
% Draw the calendar:
\fbox{%
 \begin{tikzpicture}
  % header row
  \path (0,0) node {Mon};
  \path (1,0) node {Tue};
  \path (2,0) node {Wed};
  \path (3,0) node {Thu};
  \path (4,0) node {Fri};
  \path (5,0) node {Sat};
  \path (6,0) node {Sun};
  % Now iterate through the the month of March:
  \pgfcalendar{}{2014-03-01}{2014-03-31}
  {% Draw node for current day
   \path
     (\pgfcalendarcurrentweekday,-\rowcount) % coordinate
     node {\pgfcalendarcurrentday}; % node
   % Increment row count if today is a Sunday:
   \ifdate{Sunday}{\advance\rowcount by 1}{}
  }% end of loop
 \end{tikzpicture}%
}
This now produces the image shown in Figure 7.1.
Nodes can have a border and background. These can be specified in
the [⟨node options⟩]. For example:
will draw a rectangular border around the node while
will give the node a cyan circular background.
Example:
The above example can be modified to include borders and backgrounds:
% Define a new count register:
\newcount\rowcount
% Initialise:
\mycount = 1\relax
% Draw the calendar:
\fbox{%
 \begin{tikzpicture}
  \path (0,0) node[circle,fill=yellow] {Mon};
  \path (1,0) node[circle,fill=yellow] {Tue};
  \path (2,0) node[circle,fill=yellow] {Wed};
  \path (3,0) node[circle,fill=yellow] {Thu};
  \path (4,0) node[circle,fill=yellow] {Fri};
  \path (5,0) node[circle,fill=cyan] {Sat};
  \path (6,0) node[circle,fill=cyan] {Sun};
  \pgfcalendar{}{2014-03-01}{2014-03-31}{
   % Draw node for current day
   \path (\pgfcalendarcurrentweekday,-\rowcount)
     node[rectangle,draw] {\pgfcalendarcurrentday};
   % Increment row count if today is a Sunday:
   \ifdate{Sunday}{\advance\rowcount by 1}{}
  }
 \end{tikzpicture}%
}
Instead of repeatedly using the same options it's possible to set
them within a local scope using the scope environment:
% Define a new count register:
\newcount\rowcount
% Initialise:
\mycount = 1\relax
% Draw the calendar:
\fbox{%
 \begin{tikzpicture}
  \begin{scope}[every node/.style={circle,fill=yellow}]
    \path (0,0) node {Mon};
    \path (1,0) node {Tue};
    \path (2,0) node {Wed};
    \path (3,0) node {Thu};
    \path (4,0) node {Fri};
    \path (5,0) node[fill=cyan] {Sat};
    \path (6,0) node[fill=cyan] {Sun};
  \end{scope}
  \pgfcalendar{}{2014-03-01}{2014-03-31}{
   % Draw node for current day
   \path (\pgfcalendarcurrentweekday,-\rowcount)
     node[rectangle,draw] {\pgfcalendarcurrentday};
   % Increment row count if today is a Sunday:
   \ifdate{Sunday}{\advance\rowcount by 1}{}
  }
 \end{tikzpicture}%
}
This produces the image shown in Figure 7.2.
The nodes in the first row look a little uneven as the sizes vary according to the node contents. To neaten things up a bit, a minimum size can be imposed on the nodes:
% Define a new count register:
\newcount\rowcount
% Initialise:
\mycount = 1\relax
% Draw the calendar:
\fbox{%
 \begin{tikzpicture}
  \begin{scope}[every node/.style={circle,fill=yellow,minimum size=3em}]
    \path (0,0) node {Mon};
    \path (1,0) node {Tue};
    \path (2,0) node {Wed};
    \path (3,0) node {Thu};
    \path (4,0) node {Fri};
    \path (5,0) node[fill=cyan] {Sat};
    \path (6,0) node[fill=cyan] {Sun};
  \end{scope}
  \pgfcalendar{}{2014-03-01}{2014-03-31}{
   % Draw node for current day
   \path (\pgfcalendarcurrentweekday,-\rowcount)
     node[rectangle,draw] {\pgfcalendarcurrentday};
   % Increment row count if today is a Sunday:
   \ifdate{Sunday}{\advance\rowcount by 1}{}
  }
 \end{tikzpicture}%
}
This produces the image shown in Figure 7.3.
However now the nodes are bumping into each other, so they need to
be moved apart. The default ⟨x⟩ and ⟨y⟩ coordinate units
are 1 cm. This can be changed in the optional argument of the
tikzpicture environment. For example:
% Define a new count register:
\newcount\rowcount
% Initialise:
\mycount = 1\relax
% Draw the calendar:
\fbox{%
 \begin{tikzpicture}[x=1.5cm,y=1.25cm]
  \begin{scope}[every node/.style={circle,fill=yellow,minimum size=3em}]
    \path (0,0) node {Mon};
    \path (1,0) node {Tue};
    \path (2,0) node {Wed};
    \path (3,0) node {Thu};
    \path (4,0) node {Fri};
    \path (5,0) node[fill=cyan] {Sat};
    \path (6,0) node[fill=cyan] {Sun};
  \end{scope}
  \pgfcalendar{}{2014-03-01}{2014-03-31}{
   % Draw node for current day
   \path (\pgfcalendarcurrentweekday,-\rowcount)
     node[rectangle,draw,minimum width=1cm] {\pgfcalendarcurrentday};
   % Increment row count if today is a Sunday:
   \ifdate{Sunday}{\advance\rowcount by 1}{}
  }
 \end{tikzpicture}%
}
This produces the calendar shown in Figure 7.4.
The circle and rectangle shapes are always available, but there are other shapes as well that can be loaded via the relevant tikz library, which can be loaded in the preamble using:
where ⟨name⟩ is the library name. For example, there are some
multi-part shapes defined in the shapes.multipart library.
In order to use these shapes, you not only need
\usepackage{tikz}
in the preamble but also
\usetikzlibrary{shapes.multipart}
Example:
A rectangular split node with 2 splits can be created using:
\begin{tikzpicture}
 \path (0,0)
 node[rectangle split,rectangle split parts=2,draw]
 {%
   Top
   \nodepart{two}
   Bottom
 };
\end{tikzpicture}
The \nodepart{⟨part⟩} command moves from the current split
part to the split part identified by ⟨part⟩. In the case of
a rectangular split node, the second part is identified by the
keyword two. The above code produces:
With a vertical split node, such as in the above example, you can set a minimum width using the minimum width key, but you can't specify a minimum height. You can, however, specify a height for empty parts using the option rectangle split empty part height=⟨length⟩. For example:
\begin{tikzpicture}
 \path (0,0)
 node
 [
   rectangle split,
   rectangle split parts=2,
   rectangle split empty part height=1cm,
   minimum width=2cm,
   draw
 ]
 {%
   Top
   \nodepart{two}
   % empty bottom part
 };
\end{tikzpicture}
This produces:
You can specify fill colours for each part using the
rectangle split part fill={⟨colour list⟩} option, where
⟨colour list⟩ is a comma-separated list of colours for each
part, in order. For example:
\begin{tikzpicture}
 \path (0,0)
 node
 [
   rectangle split,
   rectangle split parts=2,
   rectangle split empty part height=1cm,
   rectangle split part fill={cyan,magenta},
   minimum width=2cm,
   draw
 ]
 {%
   Top
   \nodepart{two}
   % empty bottom part
 };
\end{tikzpicture}
This produces:
Since tikz loads the xcolor package [41], you can specify colours using the xcolor syntax. For example:
\begin{tikzpicture}
 \path (0,0)
 node
 [
   rectangle split,
   rectangle split parts=2,
   rectangle split empty part height=1cm,
   rectangle split part fill={cyan!20,magenta!5},
   minimum width=2cm,
   draw
 ]
 {%
   Top
   \nodepart{two}
   % empty bottom part
 };
\end{tikzpicture}
This produces:
Now the fill colour for the top part is 20% cyan tint and the fill colour for the bottom part is 5% magenta tint. This isn't a great colour scheme, but it's just used for illustrative purposes.
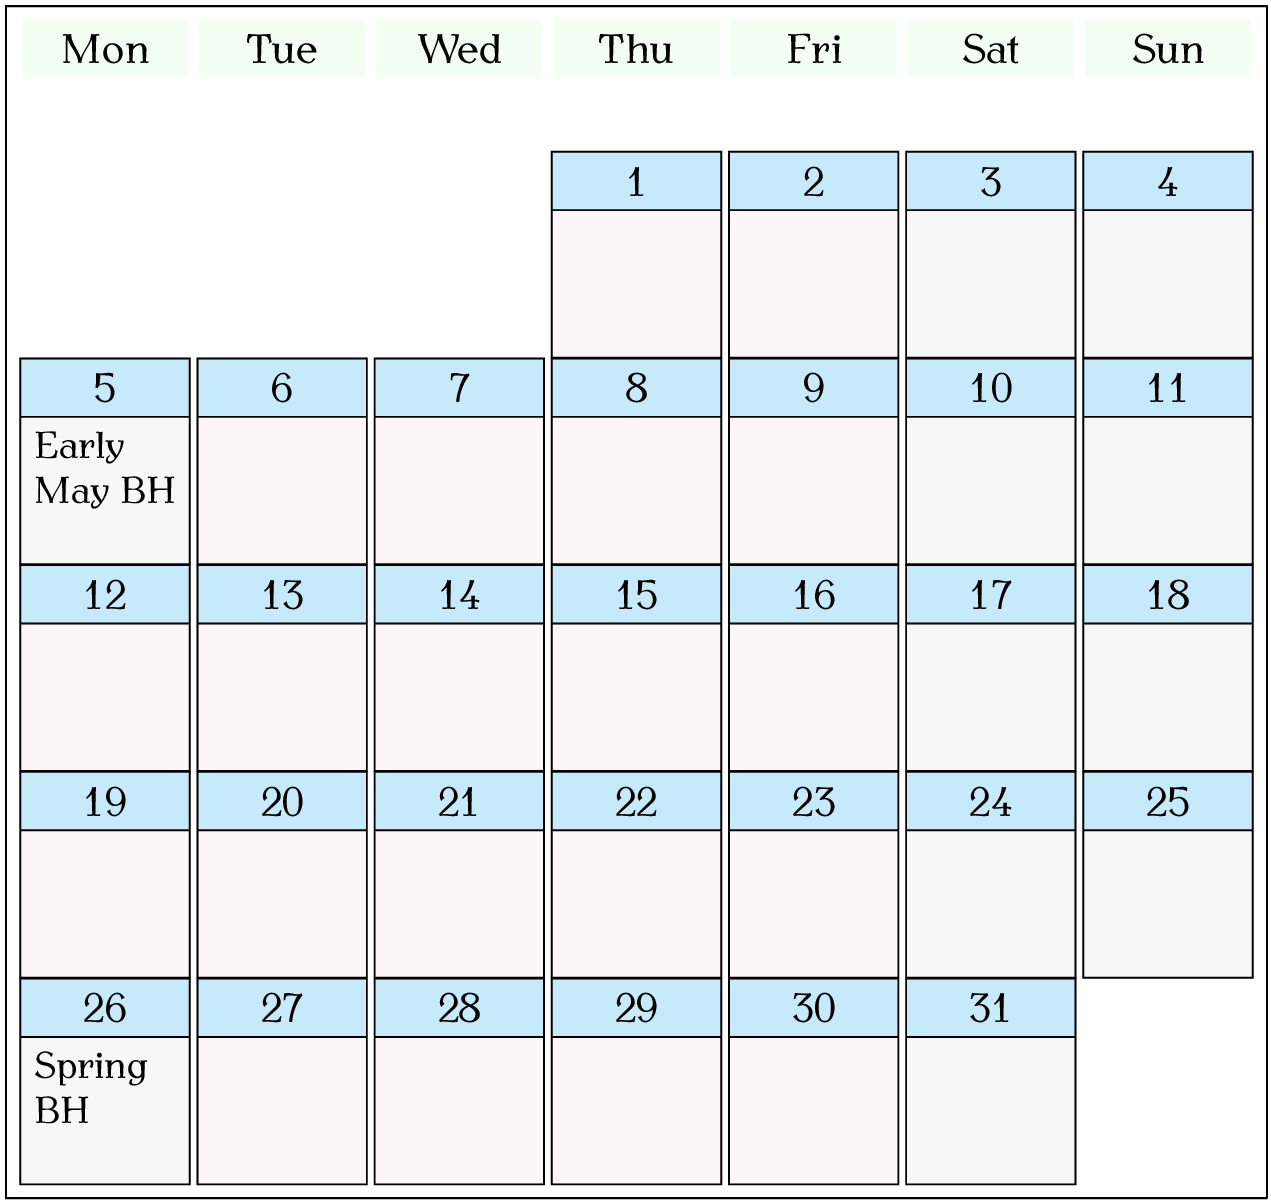
The above can be put together to create a calendar for the month of May 2014:
\newcount\rowcount
\rowcount=1\relax

\fbox{%
\let\%\pgfcalendarshorthand
\begin{tikzpicture}[x=1.5cm,y=1.75cm]
  \begin{scope}
    [every node/.style={rectangle,fill=green!5,minimum width=1.4cm}]
  \path (0,0) node {Mon};
  \path (1,0) node {Tue};
  \path (2,0) node {Wed};
  \path (3,0) node {Thu};
  \path (4,0) node {Fri};
  \path (5,0) node {Sat};
  \path (6,0) node {Sun};
  \end{scope}
  \pgfcalendar{}{2014-05-01}{2014-05-31}
  {
   \path (\pgfcalendarcurrentweekday,-\rowcount)
    node
    [
      rectangle split,
      minimum width=1.4cm,
      rectangle split empty part height=1cm,
      rectangle split parts=2,
      rectangle split part fill={cyan!20,magenta!4},
      draw]
   {\%d-
    \nodepart{two}
   };
   \ifdate{Sunday}{\advance\rowcount by 1}{}
 }
\end{tikzpicture}%
}
This produces the calendar shown in Figure 7.5.
Suppose now I want to add some information to the calendar. For
example, the two May bank holidays on the 5th and 26th of May.
Additionally, suppose I also want a different colour background for
weekends and bank holidays, for example, a light grey. The bank holiday
information can be
stored in control sequences whose names are in the format
⟨prefix⟩-⟨YYYY⟩-⟨MM⟩-⟨DD⟩,
which is the format used by \pgfcalendarsuggestedname. Recall
etoolbox's \csdef command described in
§2.1.1 Macro Definitions. This can be used to define these control
sequences:
The \pgfcalendar command now needs cal as the
⟨prefix⟩ so that in the ⟨code⟩ part, the current day can
be checked if it's a bank holiday using:
\ifcsdef{\pgfcalendarsuggestedname}%
{%
  % Current day is a bank holiday
}%
{%
  % Current day isn't a bank holiday
}
As before a TeX register called \rowcount is defined
using:
\newcount\rowcount
The actual code to generate the calendar is now:
\fbox{%
\rowcount=1\relax
\let\%\pgfcalendarshorthand
\begin{tikzpicture}[x=1.5cm,y=1.75cm]
  \begin{scope}
    [every node/.style={rectangle,fill=green!5,minimum width=1.4cm}]
  \path (0,0) node {Mon};
  \path (1,0) node {Tue};
  \path (2,0) node {Wed};
  \path (3,0) node {Thu};
  \path (4,0) node {Fri};
  \path (5,0) node {Sat};
  \path (6,0) node {Sun};
  \end{scope}
  \pgfcalendar{cal}{2014-05-01}{2014-05-31}{%
   \def\thebackground{magenta!4}%
   \ifcsdef{\pgfcalendarsuggestedname}%
   {%
     \def\thecontents{\csuse{\pgfcalendarsuggestedname}}%
     \def\thebackground{black!4}%
   }%
   {%
     \def\thecontents{\mbox{}}%
     \ifdate{weekend}{\def\thebackground{black!4}}{}%
   }%
   \path (\pgfcalendarcurrentweekday,-\rowcount)
    node
    [
      rectangle split,
      rectangle split parts=2,
      rectangle split part fill={cyan!20,\thebackground},
      draw]
   {\%d-
    \nodepart{two}%
    \parbox[t][1cm]{1.2cm}{\small\thecontents}%
   };
   \ifdate{Sunday}{\advance\rowcount by 1}{}%
 }%
\end{tikzpicture}%
}
This produces the calendar shown in Figure 7.6.
Suppose now you want to fill in the gaps at the beginning and end of the
month. Recall the \foreach command mentioned in
§2.7.2 Iterating Over a Comma-Separated List. This has the syntax:
but it's cleverer than the other list macros described in that section as you can use ... within ⟨list⟩ if the list contents can be inferred from the beginning and end of the list. For example:
produces
Therefore, within the ⟨code⟩ part of \pgfcalendar, you can test
if the current day is the first day of the month (by testing that
\pgfcalendarcurrentday is equal to 1) and use \foreach to
fill in the last days of the previous month:
\ifnum\pgfcalendarcurrentday=1\relax
% Fill in days from previous month if this isn't a Monday
  \ifdate{Monday}{}
  {% Get last day of previous month
    \julianday = \pgfcalendarcurrentjulian\relax
    \advance\julianday by -\pgfcalendarcurrentweekday\relax
    \foreach \x in {0,...,\numexpr\pgfcalendarcurrentweekday-1}
    {
      \pgfcalendarjuliantodate{\julianday}{\theyear}{\themonth}{\theday}
      \path (\x,-1)
       node
       [
         rectangle split,
         rectangle split parts=2,
         draw]
      {\number\theday
       \nodepart{two}
       \parbox[t][1cm]{1.2cm}{\mbox{}}%
      };
      \global\advance\julianday by 1\relax
    }
  }
\fi
This requires a new register:
\newcount\julianday
The tikz package automatically loads the pgffor package,
so the \foreach command will also be available if you use tikz.
Note that \foreach uses a local scope for each iteration which is
why \global is required when incrementing the \julianday
register. The gap at the end of the final week can also be filled with
the initial days of the next month, but as with \foreach,
\pgfcalendar scopes each iteration, so the row register
\rowcount will need to be incremented globally so that it can be
used after the loop has completed. It's also useful to store the Julian
day number and the week day number for the last day of the month so they
can be accessed outside the loop. This saves the need to compute them again.
So the last part of
⟨code⟩ needs to replace:
with
\ifdate{Sunday}{\global\advance\rowcount by 1}{}%
\xdef\lastjulianday{\number\pgfcalendarcurrentjulian}
\xdef\lastweekday{\number\pgfcalendarcurrentweekday}
Now the remaining days of the last row can be completed outside the
\pgfcalendar loop:
 \ifnum\lastweekday < 6\relax
   \julianday = \lastjulianday\relax
   \edef\lastweekday{\number\numexpr\lastweekday+1}
   \foreach \x in {\lastweekday,...,6}
   {
     \global\advance\julianday by 1\relax
     \pgfcalendarjuliantodate{\julianday}{\theyear}{\themonth}{\theday}
     \path (\x,-\rowcount)
      node
      [
        rectangle split,
        rectangle split parts=2,
        draw]
     {\number\theday
      \nodepart{two}
      \parbox[t]{1cm}{1.2cm}{\mbox{}}%
     };
   }
 \fi
Note that you can also use \foreach to display the week day
nodes:
The complete code is:
\newcount\rowcount
\newcount\julianday
\fbox{%
\rowcount=1\relax
\let\%\pgfcalendarshorthand
\begin{tikzpicture}[x=1.5cm,y=1.75cm]
  \begin{scope}
    [every node/.style={rectangle,fill=green!5,minimum width=1.4cm}]
    \foreach \x in {0,...,6}
     {\path (\x,0) node {\pgfcalendarweekdayshortname{\x}};}
  \end{scope}
  \pgfcalendar{cal}{2014-05-01}{2014-05-31}
  {% Is this the first day of the month?
    \ifnum\pgfcalendarcurrentday=1\relax
    % Fill in days from previous month if this isn't a Monday
    \ifdate{Monday}{}
    {% Get last day of previous month
     \julianday = \pgfcalendarcurrentjulian\relax
     \advance\julianday by -\pgfcalendarcurrentweekday\relax
     \foreach \x in {0,...,\numexpr\pgfcalendarcurrentweekday-1}
     {
      \pgfcalendarjuliantodate{\julianday}{\theyear}{\themonth}{\theday}
      \path (\x,-1)
        node
        [rectangle split,
         rectangle split parts=2,
         draw]
        {\number\theday
         \nodepart{two}
         \parbox[t][1cm]{1.2cm}{\mbox{}}%
        };
      \global\advance\julianday by 1\relax
     }
    }
    \fi
    \def\thebackground{magenta!4}%
    \ifcsdef{\pgfcalendarsuggestedname}%
    {%
      \def\thecontents{\csuse{\pgfcalendarsuggestedname}}%
      \def\thebackground{black!4}%
    }%
    {%
      \def\thecontents{\mbox{}}%
      \ifdate{weekend}{\def\thebackground{black!4}}{}%
    }%
    \path (\pgfcalendarcurrentweekday,-\rowcount)
     node
     [rectangle split,
      rectangle split parts=2,
      rectangle split part fill={cyan!20,\thebackground},
      draw]
    {\%d-
     \nodepart{two}%
     \parbox[t][1cm]{1.2cm}{\small\thecontents}%
    };
    \ifdate{Sunday}{\global\advance\rowcount by 1}{}%
    \xdef\lastjulianday{\number\pgfcalendarcurrentjulian}
    \xdef\lastweekday{\number\pgfcalendarcurrentweekday}
  }%
  \ifnum\lastweekday < 6\relax
   \julianday = \lastjulianday\relax
   \edef\lastweekday{\number\numexpr\lastweekday+1}
   \foreach \x in {\lastweekday,...,6}
   {
     \global\advance\julianday by 1\relax
     \pgfcalendarjuliantodate{\julianday}{\theyear}{\themonth}{\theday}
     \path (\x,-\rowcount)
      node
      [rectangle split,
       rectangle split parts=2,
       draw]
     {\number\theday
      \nodepart{two}
      \parbox[t]{1cm}{1.2cm}{\mbox{}}%
     };
   }
  \fi
\end{tikzpicture}%
}
The result is shown in Figure 7.7. You can download or view a complete document.
|
|
It's possible to create a general month calendar macro from the above.
First a command that can be used to set information for a given date. This
uses \appto so that information can be appended to a date.
\newcommand*{\addevent}[2]{%
  \ifcsdef{cal-#1}
  {% already defined so append info
    \csappto{cal-#1}{\newline #2}%
  }%
  {% not defined
    \csdef{cal-#1}{#2}%
  }
}
This has the syntax:
Now the definition for the calendar month macro:
\newcommand*{\calendarmonth}[2]{%
  \fbox{%
  \rowcount=1\relax
  \let\%\pgfcalendarshorthand
  \begin{tikzpicture}[x=1.5cm,y=1.75cm]
    % display the month name at the top
    \path (3,1) node {\pgfcalendarmonthname{#2}};
    \begin{scope}
      [every node/.style={rectangle,fill=green!5,minimum width=1.4cm}]
      \foreach \x in {0,...,6}
       {\path (\x,0) node {\pgfcalendarweekdayshortname{\x}};}
    \end{scope}
    \pgfcalendar{cal}{#1-#2-01}{#1-#2-last}
    {%
      % Is this the first day of the month?
      \ifnum\pgfcalendarcurrentday=1\relax
      % Fill in days from previous month if this isn't a Monday
      \ifdate{Monday}{}
      {
        % Get last day of previous month
        \julianday = \pgfcalendarcurrentjulian\relax
        \advance\julianday by -\pgfcalendarcurrentweekday\relax
        \foreach \x in {0,...,\numexpr\pgfcalendarcurrentweekday-1}
        {
          \pgfcalendarjuliantodate
            {\julianday}{\theyear}{\themonth}{\theday}
          \path (\x,-1)
           node
           [
             rectangle split,
             rectangle split parts=2,
             draw]
          {\number\theday
           \nodepart{two}
           \parbox[t][1cm]{1.2cm}{\mbox{}}%
          };
          \global\advance\julianday by 1\relax
        }
      }
      \fi
      \def\thebackground{magenta!4}%
      \ifcsdef{\pgfcalendarsuggestedname}%
      {%
        \def\thecontents{\csuse{\pgfcalendarsuggestedname}}%
        \def\thebackground{black!4}%
      }%
      {%
        \def\thecontents{\mbox{}}%
        \ifdate{weekend}{\def\thebackground{black!4}}{}%
      }%
      \path (\pgfcalendarcurrentweekday,-\rowcount)
       node
       [
         rectangle split,
         rectangle split parts=2,
         rectangle split part fill={cyan!20,\thebackground},
         draw]
      {\%d-
       \nodepart{two}%
       \parbox[t][1cm]{1.2cm}{\small\thecontents}%
      };
      \ifdate{Sunday}{\global\advance\rowcount by 1}{}%
      \xdef\lastjulianday{\number\pgfcalendarcurrentjulian}
      \xdef\lastweekday{\number\pgfcalendarcurrentweekday}
    }%
    \ifnum\lastweekday < 6\relax
     \julianday = \lastjulianday\relax
     \edef\lastweekday{\number\numexpr\lastweekday+1}
     \foreach \x in {\lastweekday,...,6}
     {
       \global\advance\julianday by 1\relax
       \pgfcalendarjuliantodate{\julianday}{\theyear}{\themonth}{\theday}
       \path (\x,-\rowcount)
        node
        [
          rectangle split,
          rectangle split parts=2,
          draw]
       {\number\theday
        \nodepart{two}
        \parbox[t][1cm]{1.2cm}{\mbox{}}%
       };
     }
    \fi
  \end{tikzpicture}%
  }
}
The syntax for this macro is:
Don't forget you also need to define the registers:
Create a landscape document that has a calender month per page for 2014 (or the year of your choice). Read the tikz chapter of the pgf manual [102] to find ways of modifying the above code. You can download or view a solution.
This book is also available as A4 PDF or 12.8cm x 9.6cm PDF or paperback (ISBN 978-1-909440-07-4).